# Tile Layer
Learn how to create a basic map with the Tile layer through our step-by-step instructions.
## Content
A Tile layer displays the virtual earth tile background on the map.
Use the following steps for creating a basic map using the Tile layer. These steps assume that you have added a page layout template to your report and have a data connection in place. See [Data Binding in Page/RDLX Reports](/activereportsnet/docs/report-authors/data-binding/data-binding-page-rdl-reports) for more information.
1. From the toolbox, drag and drop a [Map](/activereportsnet/docs/report-authors/report-controls/report-controls-page-rdl-report/map) control onto the design surface.
2. In the **Select a Map Template** wizard that appears, select the **New Map** template.
3. Click the map until the map panes appear.
4. Right-click inside the area labeled "Right click to add the new layer." and select **Add Tile Layer**. This adds a tile layer to the map and opens the **Map Tile Properties** dialog.
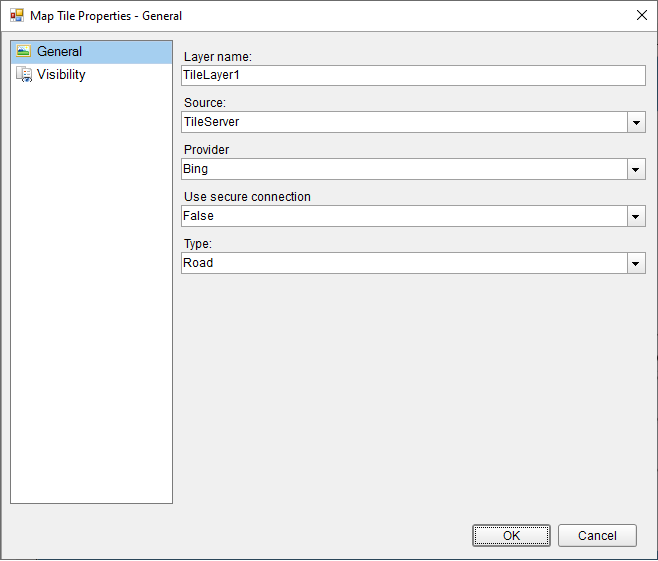
5. In the **Map Tile Properties** dialog that appears, on the **General** page, set the layer name and choose its Source and Type. The default values in these fields also work fine.
6. In the **Provider** property, choose one from the following supported tile providers:
* **Bing**: The Microsoft Bing Map server offers static map images. This requires an Application key for authentication. The default key provided by ActiveReports is for demo purposes and can't be used by 3rd party applications. To obtain a Bing Map Key, see [HowTo - Create a Bing Map Account](https://learn.microsoft.com/en-us/bingmaps/getting-started/bing-maps-dev-center-help/creating-a-bing-maps-account?redirectedfrom=MSDN) and [HowTo - Get a Bing Map Key](https://learn.microsoft.com/en-us/bingmaps/getting-started/bing-maps-dev-center-help/getting-a-bing-maps-key?redirectedfrom=MSDN).
> type=note
> **Note**: After generating the key, add the following script in the ActiveReports.config file to configure embedded Bing tile provider with Application key.
>
> Script
>
> ```xml
>
> 5
> "Your Application Key"
>
> ```
*
> type=warning
> **Caution**: The ActiveReports.config file should always be placed in the same folder as the EndUserDesigner.exe file for displaying a Bing tile layer on a Map.
* **Google**: The Google Map server creates your map tiles based on URL parameters sent through a standard HTTP request that returns the map tiles as an image. It is necessary to set the API key to monitor the usage of this tile server with the [Google](https://developers.google.com/maps/documentation) API Console. Please register with Google account with the billing information to obtain a key.
> type=note
> **Note**: After obtaining the key, add the following script in the ActiveReports.config file to configure embedded Google tile provider with ApiKey.
>
> Script
>
> ```xml
>
>
>
>
>
>
>
> ```
* **MapQuest**: The MapQuest tile server provides the tiles in a format similar to Google. This tile server requires an API Key for authentication which can be obtained by registering at [MapQuest](https://developer.mapquest.com/).
> type=note
> **Note**: After generating the key, add the following script in the ActiveReports.config file to configure embedded MapQuest tile provider with ApiKey.
>
> Script
>
> ```xml
>
>
>
>
>
>
>
> ```
* **OpenStreetMap**: The OpenStreetMap server provides the tiles in an index based format. This tile server provides only the roadmap and returns fixed size images (256x256). Before using the OpenStreetMap server, go through the [Copyright and License](https://www.openstreetmap.org/copyright) and [Tile usage policy](https://operations.osmfoundation.org/policies/tiles/) pages.
7. Go to the **Visibility** page of the dialog and make sure the layer visibility is set to **Show**. You can also select options to show or hide a layer based on any expression or zoom value.
8. Click **OK** to close the dialog and go to the preview tab to view the map.
> type=note
> **Note**: If you are using a proxy server connection to see the map tile images, you need to set credentials for the proxy server in the application config file for authentication. To use your default proxy server credentials, you can do the following:
>
> For Visual Studio Designer (IDE)
>
> 1. Find **devenv.exe.config** (the devenv.exe configuration file) in: Program Files (x86)\\Microsoft Visual Studio\\_2019 or 2022_\\Professional\\Common7\\IDE
> 2. In the configuration file, find the block, and add this code:
>
> ```xml
>
> ```
>
>
> For Visual Studio Application
>
> 1. On the menu bar, choose **Project, Add New Item** and then choose the **Application Configuration File** template.
> 2. In the **Name** text box, enter a name, and then click **Add** button.
> 3. In the configuration file, add this code:
>
> ```xml
>
> ```
> type=note
> **Note**: ActiveReports.config file should be kept inside the project **Debug** folder and added to a Visual Studio project for displaying a Tile layer on a Map in any Viewer control.