# Get Started With Mail Merge Reports
Learn how you can create a mail merge report using ActiveReportsJS.
## Content
### Introduction
A mail merge is a way to generate multiple documents at once by applying data records to a pre-defined template. In ActiveReportsJS, you can build such a report using a variety of ways. If a document template can be expressed as an HTML fragment, then you can use a [RichText report item](/activereportsjs/docs/v6.1/ReportAuthorGuide/Report-Items/Data-Visualizers/RichText) together with a [List data region](/activereportsjs/docs/v6.1/ReportAuthorGuide/Report-Items/Data-Regions/List). Examples of mail merge reports are letters, coupons, and others.
This tutorial builds the Promotion Coupon list from the ground up, providing experience with the typical report designing process. By the end, you will be able to do the following:
* Create a new report
* Bind the report to the OData API
* Use the OData [$select](https://www.odata.org/getting-started/basic-tutorial/#select) query option to reduce the volume of retrieved data
* Use field tags to define the data type of a field
* Create a [List data region](/activereportsjs/docs/v6.1/ReportAuthorGuide/Report-Items/Data-Regions/List), bind it to the data, and set the filter for the data to be displayed
* Configure Grouping of a List Data Region
* Use a [RichText](/activereportsjs/docs/v6.1/ReportAuthorGuide/Report-Items/Data-Visualizers/RichText) report item to display a dynamic HTML content
Upon completing all tutorial steps, the final report will look like this: [live demo](/activereportsjs/demos/Reports/GetStartedWithMailMergeReports/purejs).
### Prerequisites
The following content assumes that you have the Standalone Report Designer running. Visit the [tutorial](/activereportsjs/docs/v6.1/ReportAuthorGuide/QuickStart/Get-Started-With-Designer-App) for detailed information. A stable internet connection is also required to access the [Demo Data Hub](https://demodata.mescius.io).
### Creating a New Report
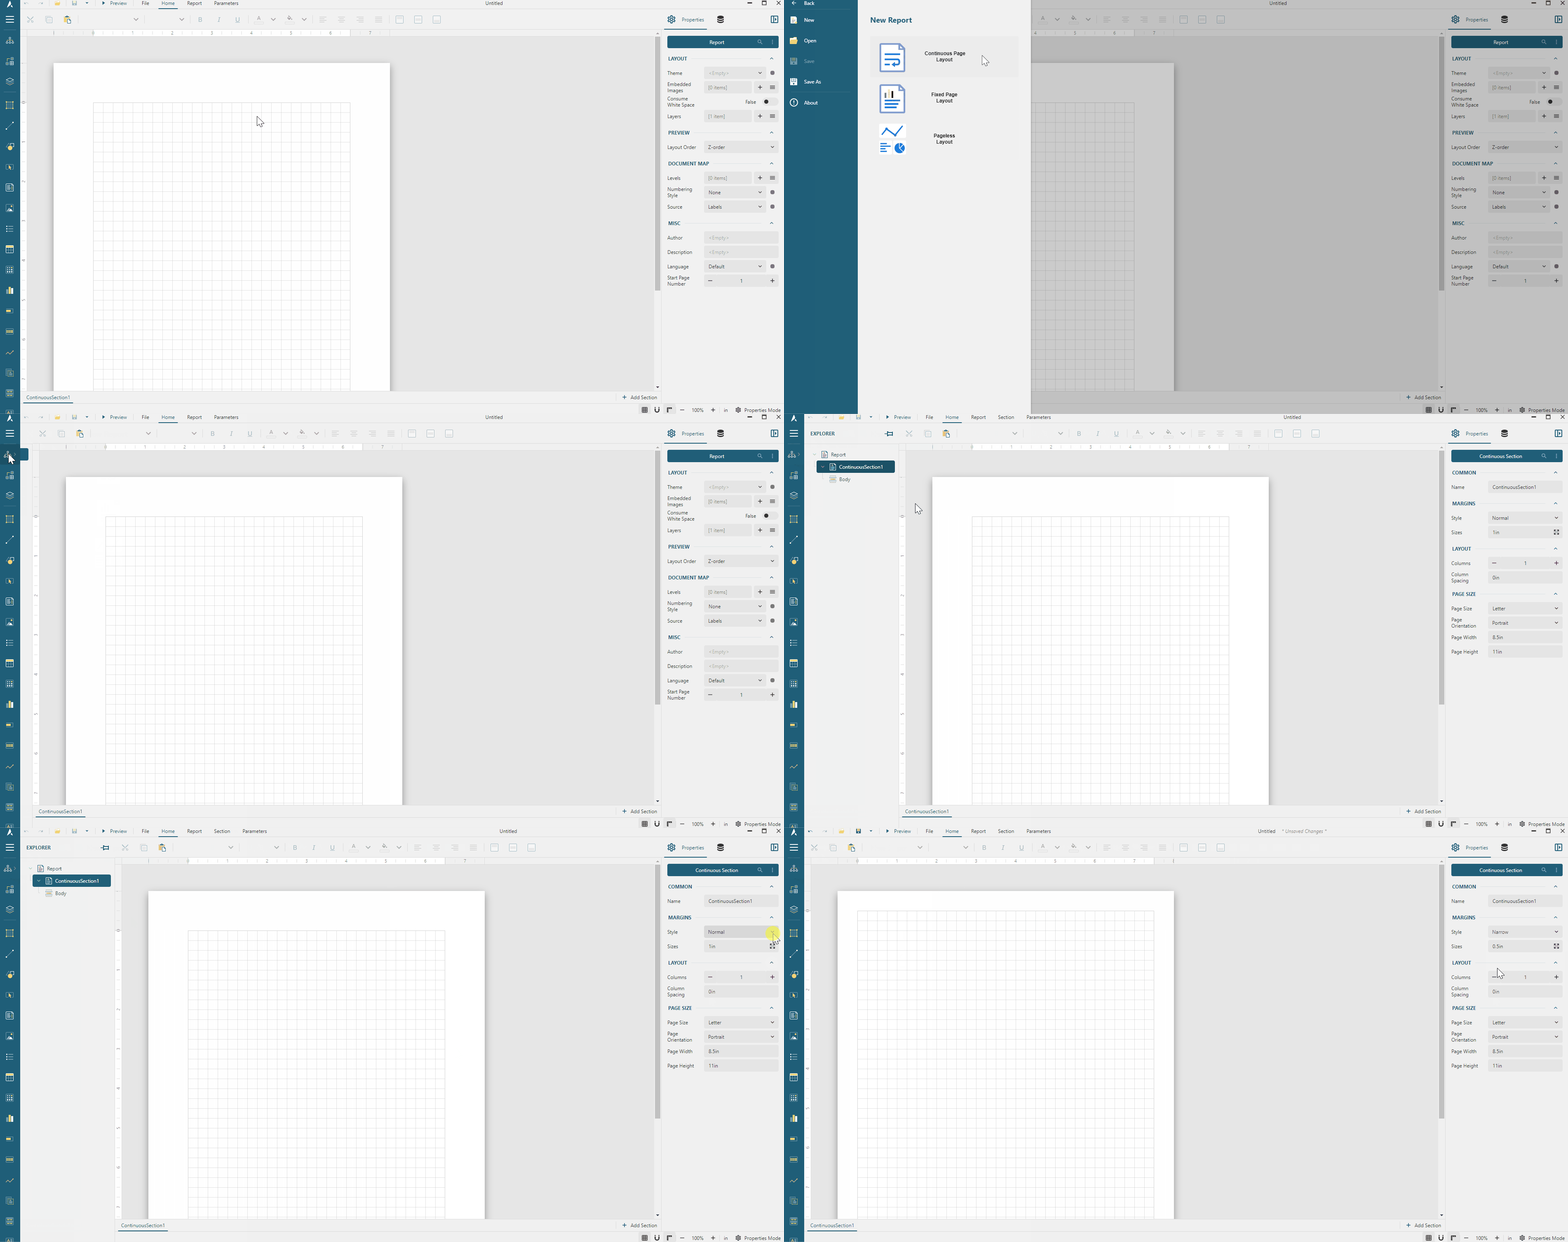
In the standalone report designer, click the [File menu](/activereportsjs/docs/v6.1/ReportAuthorGuide/QuickStart/Get-Started-With-Designer-App#file-menu) and select the [Continuous Page Layout](/activereportsjs/docs/v6.1/ReportAuthorGuide/report-configuration/Report-Layouts#continuous-page-layout) template for a newly created report. Click anywhere on the gray area around the report layout to load the report properties in the [properties panel](/activereportsjs/docs/v6.1/ReportAuthorGuide/Report-Designer-Interface#properties-panel). In the `Margins` section, set the `Style` property to `Narrow` to change the [report page](/activereportsjs/docs/v6.1/ReportAuthorGuide/report-configuration/layout-properties#page-settings) margins size.
DOC-DETAILS-TAG-OPEN
DOC-SUMMARY-TAG-OPEN
Expand to watch creating a new report in action
DOC-SUMMARY-TAG-CLOSE
DOC-DETAILS-TAG-CLOSE
### Data Binding
[Data Binding](/activereportsjs/docs/v6.1/ReportAuthorGuide/Databinding) establishes a connection between a report and the data it displays. For this demo, we use the [MESCIUS Demo OData API](https://demodata.mescius.io/swagger/index.html?urls.primaryName=OData%20Contoso) that contains the sales data for a fictitious company called Contoso that is a manufacturing, sales, and support organization with more than 100,000 products.
### Adding Data Source
You can think of the [Contoso OData API](https://demodata.mescius.io/swagger/index.html?urls.primaryName=OData%20Contoso) as the "database" that you can connect to using its root URL `https://demodata.mescius.io/contoso/odata/v1`, and that has multiple "tables" which presented with endpoints such as [/DimCustomers](https://demodata.mescius.io/contoso/odata/v1/DimCustomers), [/DimStores](https://demodata.mescius.io/contoso/odata/v1/DimStores), and [/DimProducts](https://demodata.mescius.io/contoso/odata/v1/DimProducts). Using the following steps, you can create a Report DataSource that establishes the connection to such a "database."
* Open the [Data panel](/activereportsjs/docs/v6.1/ReportAuthorGuide/Report-Designer-Interface#data-panel) of the property inspector and click the `Add` button.
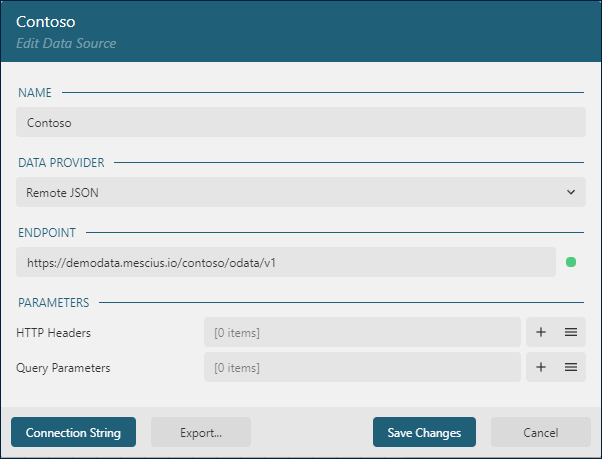
* In the Data Source editor dialog, type `Contoso` in the NAME field and `https://demodata.mescius.io/contoso/odata/v1` in the ENDPOINT field.
* Click the `Save Changes` button
### Adding Data Set
Data Sets represent one or more endpoints of the Data Source. For the Promotion Coupon list, we need access to the data from the [DimPromotions](https://demodata.mescius.io/contoso/odata/v1/DimPromotions) endpoint of the Contoso Data Source that we added in the previous section.
Use the following steps to add the `Promotions` data set:
* Click the `+` icon near `Contoso` in the Data panel.
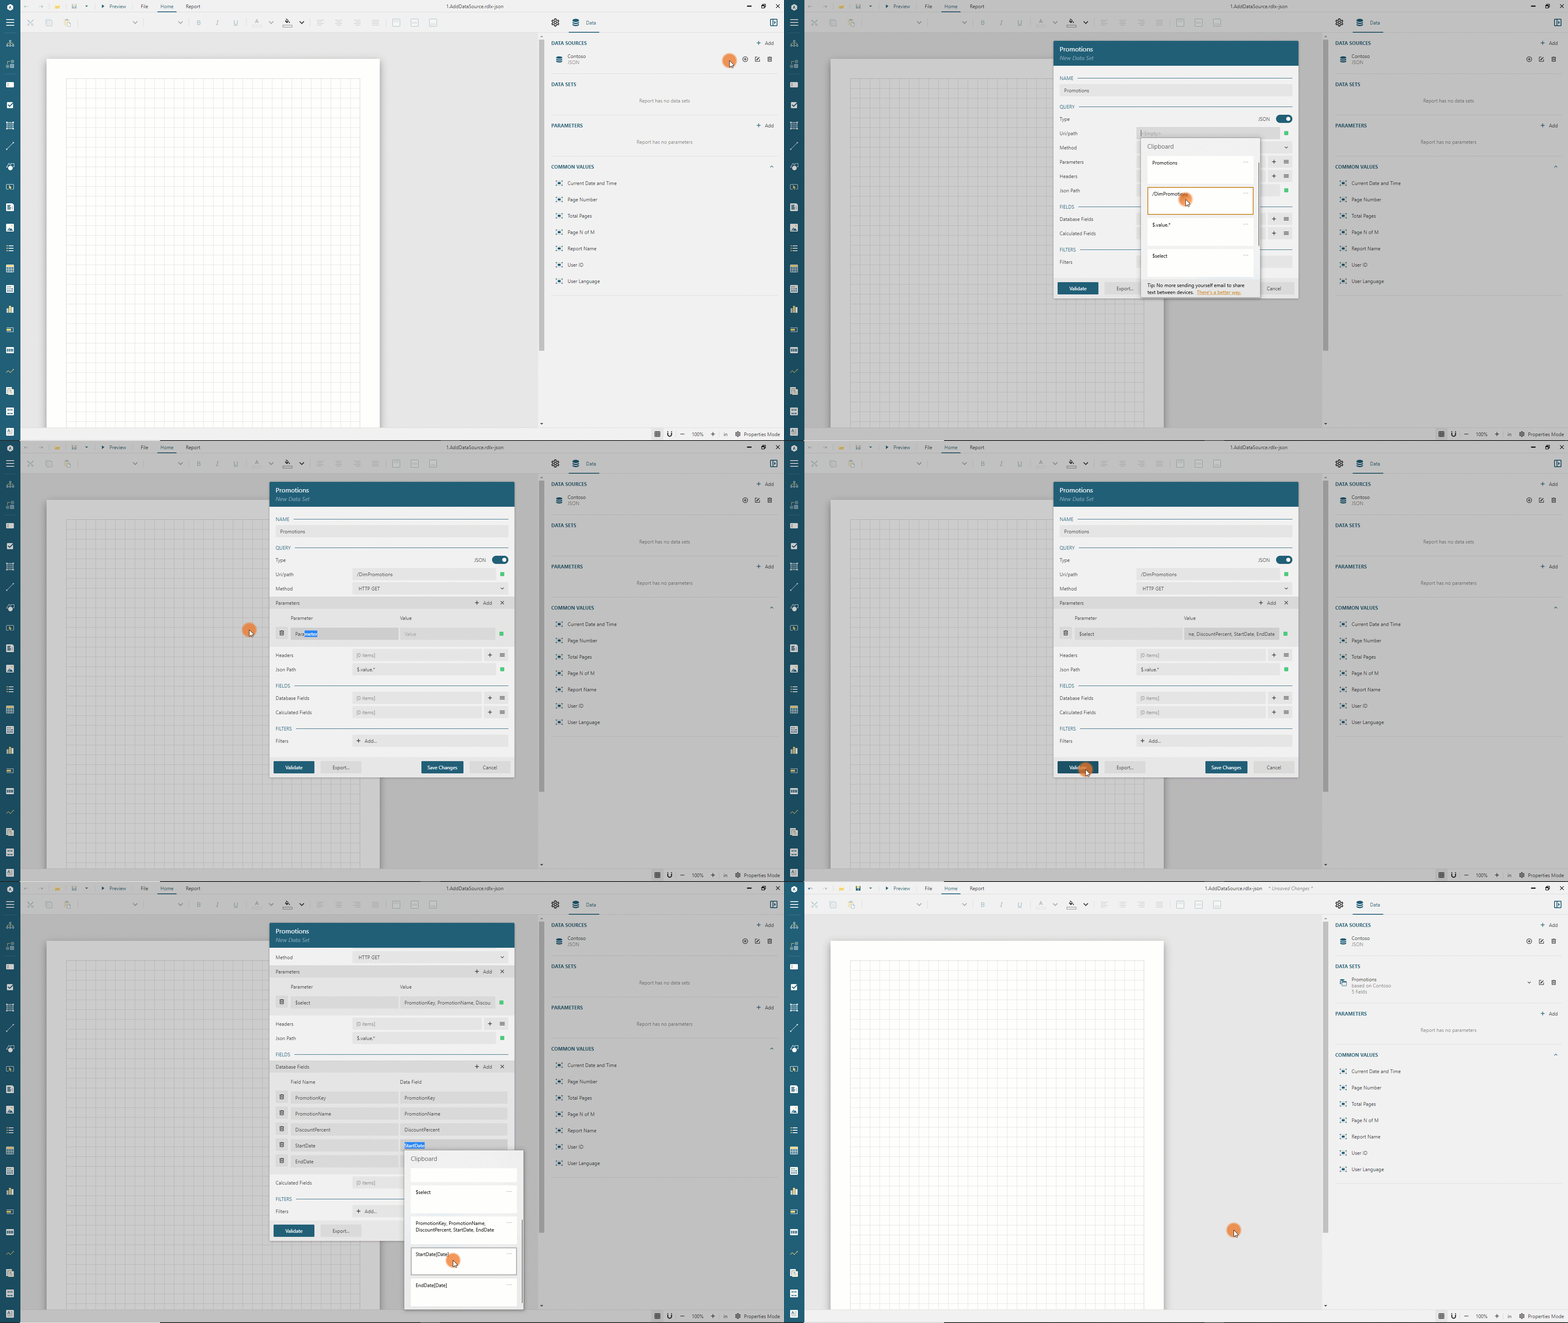
* In the Data Set Editor dialog, type `Promotions` in the NAME field, `/DimPromotions` in the Uri/Path field, and `$.value.*` in the `Json Path` field.
* By default, each `Promotion` record includes 14 fields, but we don't need them all. Therefore we limit the retrieved fields by applying the OData [$select query option](https://www.odata.org/getting-started/basic-tutorial/#select) via a query parameter.
* Click the `+` icon on the right side of the `Parameters` section.
* Type `$select` in the `Parameter` field of the newly added `Parameter` item.
* Type `PromotionKey, PromotionName, DiscountPercent, StartDate, EndDate` in the `Value` field of the same `Parameter` item.
* Click the `Validate` button.
* Ensure that the `DataBase Fields` section displays `[5 items]` text.
* Expand the `DataBase Fields` section and set the `DataField` property of the `StartDate` and the `EndDate` fields to `StartDate[Date]` and `EndDate[Date]`, respectively.
* Click the `Save Changes` button.
DOC-DETAILS-TAG-OPEN
DOC-SUMMARY-TAG-OPEN
Expand to watch adding the Promotions data set in action
DOC-SUMMARY-TAG-CLOSE
DOC-DETAILS-TAG-CLOSE
### Adding List
To display promotion coupons, we will use [List](/activereportsjs/docs/v6.1/ReportAuthorGuide/Report-Items/Data-Regions/List) data region:
* Expand the [toolbox](/activereportsjs/docs/v6.1/ReportAuthorGuide/Report-Designer-Interface#toolbox) using the `Hamburger` menu located on the left side of the toolbar.
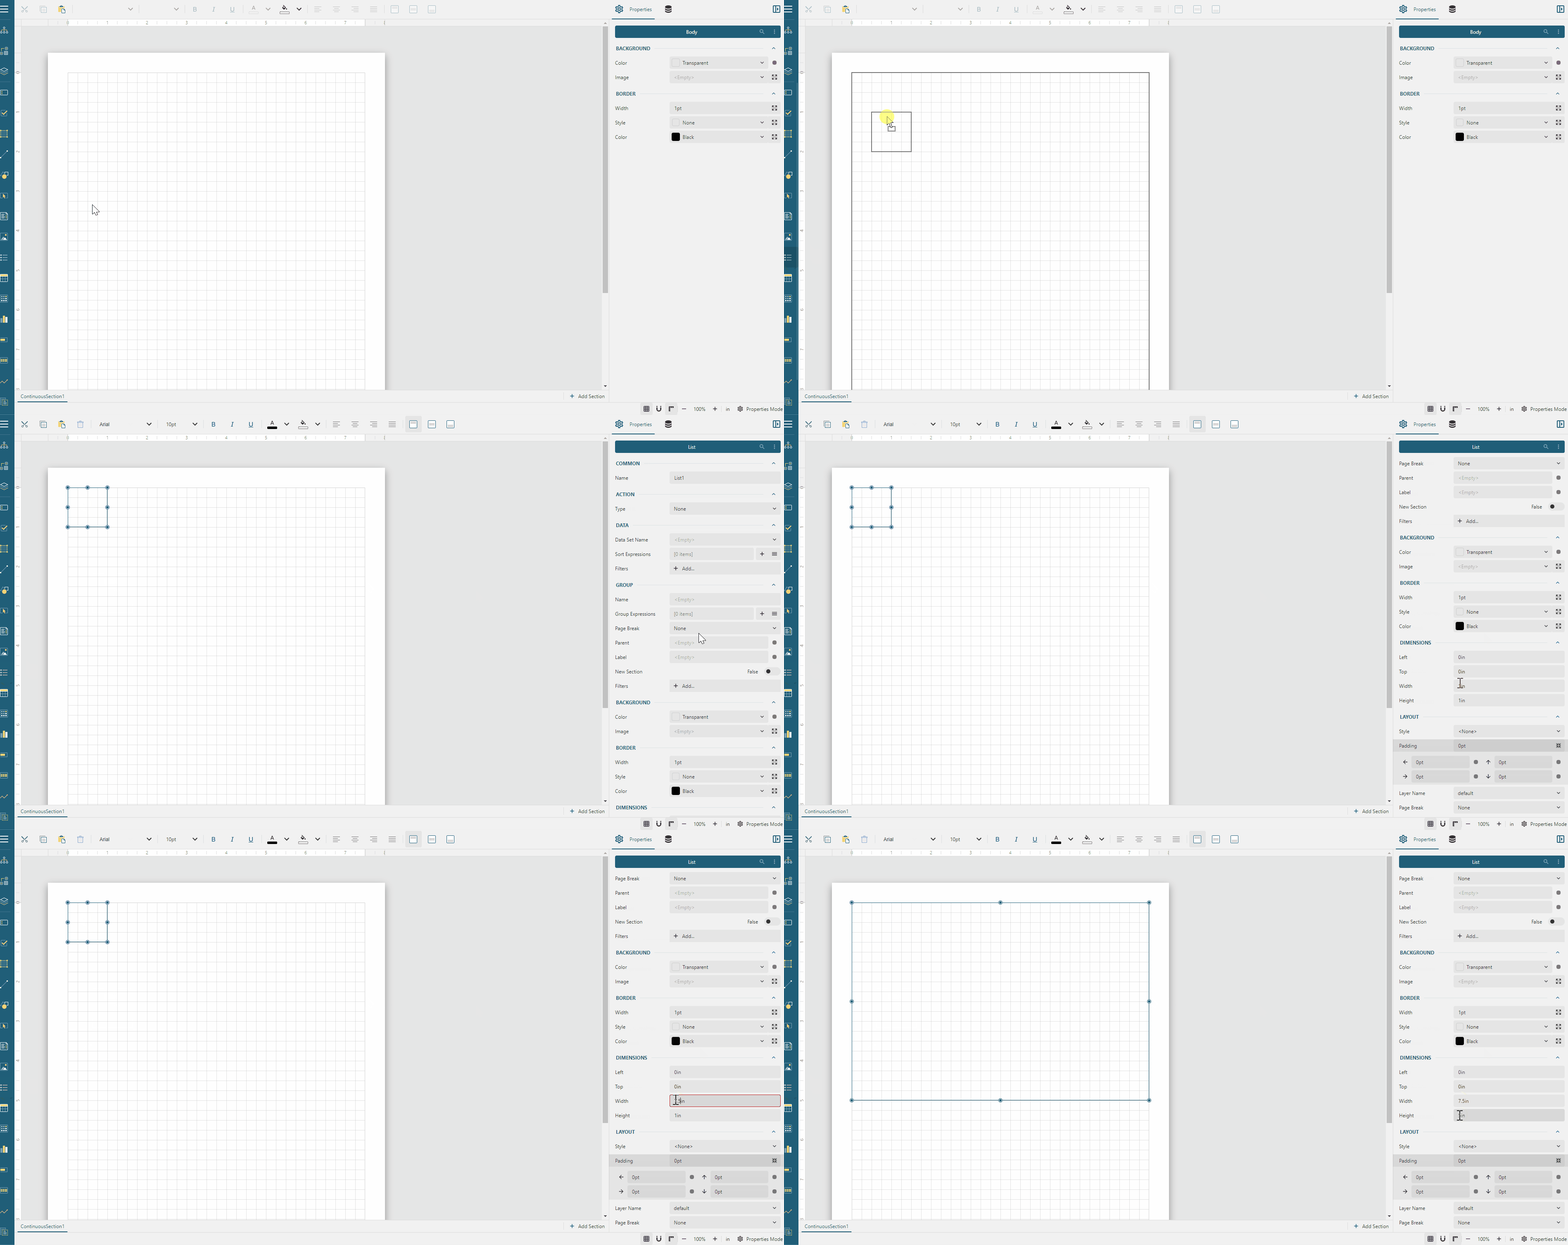
* Drag and drop the `List` item from the toolbox to the report page area's top-left corner.
* Switch to the [Properties panel](/activereportsjs/docs/v6.1/ReportAuthorGuide/Report-Designer-Interface#properties-panel) in the Property inspector.
* Select the `Promotions` item in the `Data Set Name` drop-down
* Set the `Width` property to `7.5in` so that the list occupies the available printable area defined by the report [page size and margins](/activereportsjs/docs/v6.1/ReportAuthorGuide/report-configuration/layout-properties#page-settings).
* Set the `Height` property to `5in`.
* Click the `+Add...` link in the [Filters Editor](/activereportsjs/docs/v6.1/ReportAuthorGuide/Report-Designer-Interface#filters-editor).
* Click the `+Add...` button and select `DiscountPercent` in the popup menu.
* Select the `Greater Than` for the filter operator.
* Click the text area on the right side of the `>` sign and type `0`.
DOC-DETAILS-TAG-OPEN
DOC-SUMMARY-TAG-OPEN
Expand to watch adding the List in action
DOC-SUMMARY-TAG-CLOSE
DOC-DETAILS-TAG-CLOSE
### Setting List Grouping
To display each promotion coupon on a separate page, we will configure the [List Grouping](/activereportsjs/docs/v6.1/ReportAuthorGuide/Report-Items/Data-Regions/List#list-grouping):
* Exit the Filters Editor by clicking the `Back` button.
* Click the `+` icon on the right side of the `Group Expressions` property in the `Group` section in the Property inspector.
* Click the gray box on the right side of the newly added item and select the `PromotionKey` field.
* Set the `Page Break` property to `Between`.
### Adding RichText
We will use the [Rich Text](/activereportsjs/docs/v6.1/ReportAuthorGuide/Report-Items/Data-Visualizers/RichText) report item to display the promotion coupon details:
* Expand the toolbox using the `Hamburger` menu located on the toolbar's left side.
* Drag and drop the [RichText](/activereportsjs/docs/v6.1/ReportAuthorGuide/Report-Items/Data-Visualizers/RichText) item from the toolbox to the top-left corner of the List report that we added previously.
* Set the following properties for the newly added richtext in the properties panel.
| Property | Value |
| -------- | ----- |
| Top | 0in |
| Left | 0in |
| Width | 7.5in |
| Height | 5in |
| Border Width | 5pt |
| Border Style | Dotted |
| Border Color | #bbb |
| Padding | 16pt 2pt 16pt 2pt |
Click the gray box on the right side of the `Value` property editor and select the `Expression...` item. Then, in the [Expression dialog](/activereportsjs/docs/v6.1/ReportAuthorGuide/Report-Designer-Interface#expression-editor), set the following value and click the `Save` button.
```html
{PromotionName}

{Format(DiscountPercent, "P0")} OFF YOUR PURCHASE*
*Valid from {Format(StartDate, "d")} to {Format(EndDate, "d")} in all of our stores. Cannot be combined with any other offers. No cash value. Northwind Traders can cancel promotion at any time.
```
Check the [RichText documentation](/activereportsjs/docs/v6.1/ReportAuthorGuide/Report-Items/Data-Visualizers/RichText) for the full list of supported HTML tags and CSS styles.
### Preview the report output
You can now [preview](/activereportsjs/docs/v6.1/ReportAuthorGuide/QuickStart/Get-Started-With-Designer-App#preview-button) the report output and navigate the list of promotion coupons. You can print the output or export it to a PDF document. Note that each coupon is displayed on a separate page because we set the Page Break option to `Between` for the List Grouping.
The final version of the report is available at the [demo website](/activereportsjs/demos/Reports/GetStartedWithMailMergeReports/purejs).